Sunday, June 30, 2019

Differences Between Method Overloading and Method Overloading in Java

Differences Between Method Overloading and Method Overloading in Java


Sl No Property Method Overloading Method Overriding
1 Method Names The Method names must be SAME for Method Overloading The Method names must be SAME for Method Overriding
2 Argument Types Argument Types must be different(At least the order must be different) The Arguments Type must be Same including the Order
3 Method Signatures The Method Signatures must be Different The Method Signatures must be Same
4 Return Types No Restrictions Must be same until 1.4V. From 1.5V onwards, Co-Variant Return types allowed
5 private, static, final Methods Can be Overloaded Cannot be Overridden
6 Access Modifiers No Restrictions The scope of the Access modifiers cannot be reduced but we can happily increase the scope(Private > Default > Protected > Public)
7 'Throws’ clause No Restrictions If the Child class method throws any checked Exception, the parent class method must compulsarily throw the same Checked Exception or its Parent’s Checked Exception. However, there is no restrictions for Unchecked Exceptions
8 Method Resolution Method Resolution is always taken care by Compiler based on referrenced Type Method Resolution is always taken care by JVM based on runtime Object.
9 Also known As (names) Also known as Compile Time Polymorphism or Static Polymorphism or Early Binding Also known as Run Time Polymorphism or Dynamic Polymorphism or Late Binding

Thursday, June 27, 2019

How check if an Element is present in Selenium WebDriver

How check if an Element is present in Selenium WebDriver(5 Ways)


1) To check if Element Present on WebPage:

Key: use idDisplayed() method
Below, the first block of code checks out the size of the element. Every Element in Selenium has a size. So, if the Size of the Element is zero, it means that the element is not present on the web
if( driver.findElement(By.cssSelector("a > font")).isDisplayed()){
System.out.println("Element is Visible");
}else{
System.out.println("Element is InVisible");
}
Key: use Not Null checks
Below, an Element is not NULL if it is present on the web page. Hence, in the second block of code above, once the if condition returns true(Element is not null), we have the output Element is present.
if(driver.findElement(By.xpath("value"))!= null){
System.out.println("Element is Present");
}else{
System.out.println("Element is Absent");
}
Also, 

2) To check if element is Visible on WebPage:

if( driver.findElement(By.cssSelector("a > font")).isDisplayed()){
System.out.println("Element is Visible");
}else{
System.out.println("Element is InVisible");
}
The isDisplayed() method comes handy when we need to check if an element is displayed on the webpage. If returns a boolean which can be useful to ascertain if the element on the web page is visible. We can use the if condition on the isDisplayed() method and decide on the navigation flow based on the element’s availability on the DOM.


3) To check if Element is Enabled on the WebPage:

if( driver.findElement(By.cssSelector("a > font")).isEnabled()){
System.out.println("Element is Enable");
}else{
System.out.println("Element is Disabled");
}
The isEnabled() method comes handy when we need to check if an element is enabled for clicking or performing some action on it, on the webpage. If returns a boolean which can be useful to ascertain if the element on the web page is ready for being interacted with(perform actions on it/use it in our script). We can use the if condition on the isEnabled() method as above and decide on the navigation flow based on the element being enabled on the DOM.

4) To check text present:

if(driver.getPageSource().contains("Text to check")){
System.out.println("Text is present");
}else{
System.out.println("Text is absent");
}
Most Elements on the Web page have an associated text. This element property can be used smartly to check if an element is present on the web page. Like, if the pageSource of the webpage contains the associated element’s text, we can infer that the element is present on the webpage.

Tuesday, June 18, 2019

Right Click in Selenium WebDriver

How to Perform Right click in Selenium?
Hi Friends, many a time, in our automation, we may need to right click or context click an element. Later, this action is followed up by pressing the UP/DOWN arrow keys and ENTER key to select the desired context menu element 
For right clicking an element in Selenium, we make use of the Actions class. The Actions class provided by Selenium Webdriver is used to generate complex user gestures including right click, double click, drag and drop etc.

Right Click using Actions Class:

Actions action = new Actions(driver);
WebElement eledriver.findElement(By.id("Log in"));
action.contextClick(ele).perform();
Here, we are instantiating an object of Actions class. After that, we pass the WebElement to be right clicked as parameter to the contextClick() method present in the Actions class. Then, we call the perform() method to perform the generated action.
Sample code to right click an element
package LearnSelenium;

import org.openqa.selenium.By;
import org.openqa.selenium.WebDriver;
import org.openqa.selenium.WebElement;
import org.openqa.selenium.firefox.FirefoxDriver;
import org.openqa.selenium.interactions.Actions;

public class RightClick {
 
 public static void main(String[] args) throws InterruptedException{
  WebDriver driver = new FirefoxDriver();
  
  //Launching WebPage to Perform Right Click
  driver.get("http://www.facebook.com");
  
  //Right click in the TextBox to enter the Email for Login
  Actions action = new Actions(driver);
  WebElement searchBox = driver.findElement(By.id("email"));
  action.contextClick(searchBox).perform();
  
  //Thread.sleep just for user to notice the event
  Thread.sleep(4000);
  
  //Closing the driver instance
  driver.quit();
 }
 
 
}

Double Click in Selenium WebDriver

How to Perform Double click in Selenium?
Hi Friends, in this post, we will learn how to double click an element using Selenium Webdriver with Java. For double clicking an element in Selenium, we make use of the Actions class. The Actions class provided by Selenium Webdriver is used to generate complex user gestures including right click, double click, drag and drop etc.

Double Click using Actions Class:

Actions action = new Actions(driver);
WebElement element = driver.findElement(By.id("Log in"));
action.doubleClick(element).perform();
Here, we are instantiating an object of Actions class. After that, we pass the WebElement to be double clicked as parameter to the doubleClick() method present in the Actions class. Then, we call the perform() method to perform the generated action.

Sample code to right click an element
package LearnSelenium;

import org.openqa.selenium.By;
import org.openqa.selenium.WebDriver;
import org.openqa.selenium.WebElement;
import org.openqa.selenium.firefox.FirefoxDriver;
import org.openqa.selenium.interactions.Actions;

public class DoubleClick {
 
 public static void main(String[] args) throws InterruptedException{
  WebDriver driver = new FirefoxDriver();
  
  //Launching sample website
  driver.get("http://www.facebook.com");  driver.manage().window().maximize();
  
  //Double click the button to launch an alertbox
  Actions action = new Actions(driver);
  WebElement ele = driver.findElement(By.id("Log in"));
  action.doubleClick(ele).perform();
  
  //Thread.sleep just for user to notice the event
  Thread.sleep(5000);
  
  //Closing the driver instance
  driver.quit();
 } 
 
}


Mouseover in Selenium WebDriver

Mousehover in Selenium WebDriver

Hi Friends, today we shall learn how to perform mousehover over an element using Selenium Webdriver with Java. For performing the mouse hover over an element in Selenium, we make use of the Actions class. The Actions class provided by Selenium Webdriver is used to generate complex user gestures including mouseover, right click, double click, drag and drop etc.

Mouse Hover using Actions Class:

Actions action = new Actions(driver);
WebElement element = driver.findElement(By.id("elementId"));
action.moveToElement(element).perform();
Here, we are instantiating an object of Actions class. After that, we pass the WebElement to be mouse hovered as parameter to the moveToElement() method present in the Actions class. Then, we will call the perform() method to perform the generated action.
Sample code to mouse hover over an element
package learnSelenium;

import org.openqa.selenium.By;
import org.openqa.selenium.WebDriver;
import org.openqa.selenium.WebElement;
import org.openqa.selenium.firefox.FirefoxDriver;
import org.openqa.selenium.interactions.Actions;

public class MouseOver {
 
 public static void main(String[] args) throws InterruptedException{
  WebDriver driver = new FirefoxDriver();
  
  //Launching sample website
  driver.get("http:www.facebook.com");
  driver.manage().window().maximize();
  
  //Mouseover on submit button
  Actions action = new Actions(driver);
  WebElement ele = driver.findElement(By.id("Log in"));
  action.moveToElement(ele).perform();
  
  //Thread.sleep just for user to notice the event
  Thread.sleep(5000);
  
  //Closing the driver instance
  driver.quit();
 } 
 
}


Drag and Drop in Selenium WebDriver

Drag and Drop in Selenium WebDriver


Hi Friends, today we are going to learn how to perform Drag and Drop in selenium which is one of the common use cases in automation. In this tutorial, we are going to study the handling of drag and drop event in Selenium WebDriver using Actions class. 
Actions in Selenium WebDriver
For performing a complex user gestures like drag and drop, we have a Actions class in Selenium WebDriver. Using the Actions class, we first build a sequence of composite events and then perform it using Action (an interface which represents a single user-interaction). The different methods of Actions class we will be using here are-
  • clickAndHold(WebElement element) - Clicks a web element at the middle(without releasing).
  • moveToElement(WebElement element) - Moves the mouse pointer to the middle of the web element without clicking.
  • release(WebElement element) - Releases the left click(which is in pressed state).
  • build() - Generates a composite action

Sample Code for performing drag and drop operation-
package learnSelenium;
import org.openqa.selenium.By;
import org.openqa.selenium.WebDriver;
import org.openqa.selenium.WebElement;
import org.openqa.selenium.firefox.FirefoxDriver;
import org.openqa.selenium.interactions.Actions;

public class MouseOver {
 
 public static void main(String[] args) throws InterruptedException{
  WebDriver driver = new FirefoxDriver();
  
  //Launching sample website
  driver.get("www.samplesite.com");
  driver.manage().window().maximize();

  //Identify the WebElement on which drag and drop operation needs to be performed
  WebElement fromWebElement = driver.findElement(By Locator of fromWebElement);

  //Identify the WebElement to which the above object is dropped
  WebElement toWebElement = driver.findElement(By Locator of toWebElement);
   
  //Creating object of Actions class to build composite actions
  Actions builder = new Actions(driver);
   
  //Building a drag and drop operation
  Action dragAndDrop = builder.clickAndHold(fromWebElement)
      .moveToElement(toWebElement)
      .release(toWebElement)
       .build();

  //Performing the drag and drop action
  dragAndDrop.perform();
  
    //Thread.sleep just for user to notice the event
  Thread.sleep(3000);
  
  //Closing the driver instance
  driver.quit();
 }
 
}

Selenium XPaths

Selenium Xpaths - The secrets revealed!!

What is XPath?


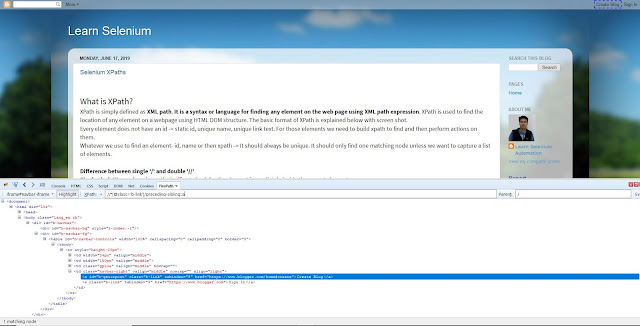
XPath is simply defined as XML pathIt is a syntax or language for finding any element on the web page using XML path expression. In another words, the XPath is used to find the location of any element on a webpage using HTML DOM structure. The basic format of XPath is explained below with screen shot.
`
Every element in the DOM does not have an id -> static id, unique name, unique link text. For those elements we need to build xpath to find and then perform actions on them.

Difference between single '/' and double '//'

Single slash '/' anywhere in xpath signifies to look for the element immediately inside the parent element.
Double slash '//' signifies to look for any child or nested-child element inside the parent element.

Syntax for XPath:
XPath contains the path of the element situated at the web page. The Standard syntax for creating XPath is.
Xpath=//tagname[@attribute='value']
  • // : Select current node.
  • Tagname: Tagname of the particular node.
  • @: Select attribute.
  • Attribute: Attribute name of the node.
  • Value: Value of the attribute.
To find the element on web pages accurately there are different types of locators:
  1. ID: To find the element by ID of the element
  2. Classname: To find the element by Classname of the element
  3. Name: To find the element by name of the element
  4. Linked text: To find the element by text of the link
  5. XPath: XPath required for finding the dynamic element
  6. CSS path: CSS path also locates elements having no name, class or ID.
Whatever locator we may use to find an element- id, name, css or then xpath -> It should always be unique. It should only find one matching node unless we want to capture a list of elements.

Types of X-path

There are two types of XPath:
1) Absolute XPath
2) Relative XPath

Absolute XPath:

It is the direct way to find the element, but the disadvantage of the absolute XPath is that if there are any changes made in the path of the element then that XPath gets failed.
The key characteristic of XPath is that it begins with the single forward slash(/) ,which means you can select the element from the root node.
Below is the example of an absolute xpath expression of the element shown in the below screen.

Absolute xpath:

html/body/div[1]/div[3]/div/div/div/div/div[2]/form/table/tbody/tr[2]/td[1]/input


Coders Tip: Using absolute Xpaths in your Selenium tests is a bad practice since with the evolution of the product, the tag names and the position of the element in the DOM changes which shall inturn break your tests. To mitigate the above situation, it is highly recommended to use Relative Xpaths.

Relative xpath:

For Relative Xpath the path starts from the middle of the HTML DOM structure. It starts with the double forward slash (//), which means it can search the element anywhere at the webpage.
You can start from the middle of the HTML DOM structure and no need to write long xpath.
Below is the example of a relative XPath expression of the same element shown in the below screen. This is the common format used to find element through a relative XPath.
Relative xpath: //*[@class='featured-box']//*[text()='Testing']


XPath Expressions:

Location paths are a subset of a more general concept called XPath expressions. These are statements that can extract useful information from the DOM tree. Instead of just finding nodes, you can count them, add up numeric values, compare strings, and more. They are much like statements in a functional programming language. There are five types, listed here:
  1. Node Functions
  2. Numeric Functions
  3. String Functions
  4. Boolean Functions
  5. Namespace Functions

X-Path Node Functions: 

A collection of nodes that match an function’s criteria, usually derived with a location path.
  1. node()function return node value.
  2. text()function return text value of specific node.
  3. comment()function matches comment node and return that specific comment node.
  4. last()function return size of total context in given context. name of this function last so it's means function not return last node value.
  5. position()function return the position of an element in the set (list) of elements in a given context.
  6. id(dtd_id)function return nodes base on passed DTD unique ID.
  7. name(node_expression): function return the string name of the last expression (node set).

Numeric Functions:

A numeric value, useful for counting nodes and performing simple arithmetic.
  1. count(node_expression): function count number of element in a specified node.
  2. sum(node_expression): function return the sum of element value in a specified node.
  3. div: XPath div function does not take any parameter its you between two numeric functions. and given to a divided value.
  4. number(): XPath number function converting string to a number.
  5. floor(): XPath foor function return largest integer round value that is equal to or less then to a parameter value. Another way we can say last round value that value return of the function.
  6. ceiling(): XPath ceiling function return smallest integer round value that is greater then or equal to a parameter value. Another way we can say next round value that value return of the function.
  7. round(): XPath round function return the round number of specified nth number of decimal place.

String Functions:

A chunk of text that may be from the input tree, processed or augmented with generated text.
  1. starts-with(string1, string2)
  2. text()
  3. contains(string1, string2)
  4. substring(string, offset, length?)
  5. substring-before(string1, string2)
  6. substring-after(string1, string2)
  7. string-length(string)
  8. normalize-space(string)
  9. translate(string1, string2, string3)
  10. concat(string1, string2, ...)

1) starts-with(string1, string2)

    Key: It returns true when first string starts with the second string.
   Thumb-Rule: //<tag-name>[starts-with(@<Attribute-name>,<Value>)]
Xpath = //div[starts-with(@id,'Log in')]

2) text()    

    Key: It returns true when string text matches the element text.
    Thumb-Rule: //<tag-name>[text(),<Value>)]
Xpath = //div[text()='Log in']

3) contains(string1, string2)

      Key: It returns true when the first string contains the second string.
    Thumb-Rule: //<tag-name>[contains(<Attribute-name/Function-name>,<Value>)]
Xpath=//div[contains(text(),'Log in')]
Xpath=//div[contains(@id,'Log in')]

4) substring(string, offset, length?)

      Key: It returns a section of the string. The section starts at offset up to the length provided.
     Thumb-Rule://<tag-name>[contains(<Attribute-name/Function-name>,substring(<string>,<int offset>,<Optional string length>))]
Xpath=//*[contains(text(),substring('Log in ',3))]

5) substring-before(string1, string2)

    Key: It returns the part of string1 up before the first occurrence of string2.
    Thumb-Rule://<tag-name>[contains(<Attribute-name/Function-name>,substring-before(<string1>,<string2>))]
Xpath= //div[contains(text(),substring-before('Jones','Jone')]

6) substring-after(string1, string2)

    Key: It returns the part of string1 after the first occurrence of string2.
    Thumb-Rule://<tag-name>[contains(<Attribute-name/Function-name>,substring-after(<string1>,<string2>))]
Xpath= //div[contains(text(),substring-after('Jones','Jone')]

7) string-length(string)

    Key: It returns the length of string in terms of characters.
    Thumb-Rule: string-length(//<tag-name>[@Attribute-name/Function-name()='Value'])
Xpath=string-length(//cricketer[name='MS Dhoni']/position)

8) normalize-space(string)

    Key: It trims the leading and trailing space from string.
    Thumb-Rule:normalize-space(//<tag-name>[@Attribute-name/Function-name()=<Value>])
Xpath=normalize-space(//cricketer[name='Shikhar Dhawan']/role/text())

9) translate(string1, string2, string3)

    Key: The translate() function replaces individual characters in one string with different individual characters. The string1 argument is the string whose characters you want to replace; string2 includes the specific characters in string1 that you want to replace; and string3 includes the characters with which you want to replace those string2 characters.
Xpath=translate("1234567890", "126", "ABX")
replaces each occurrence of any of the single characters “1,” “2,” or “6,” with the single character “A,” “B,” or “X,” respectively. The value returned from this function call would thus be the string “AB2345X7890.”
Like normalize-space(), the translate() function can be valuable in ensuring that two strings are equal, especially when their case — upper vs. lower — is possibly different, even though they’re otherwise apparently identical. Instead of comparing the two strings directly, compare their case-folded values using translate( ). Thus:

translate(somestring, 
   "abcdefghijklmnopqrstuvwxyz", 
   "ABCDEFGHIJKLMNOPQRSTUVWXYZ")
Every lowercase “a” in something is replaced with a capital “A,” every “b” with a “B,” and so on. Characters in something that don’t match any characters in string2 appear unchanged in the result.
Note that the lengths of string2 and string3 are usually identical but don’t need to be. If string2 is longer than string3translate( ) serves to remove characters from string1. So:
translate(somestring, 
   "abcdefghijklmnopqrstuvwxyz", 
   "")
removes from somestring all lowercase letters, while:
translate(somestring, 
   "abcdefghijklmnopqrstuvwxyz", 
   "ABCDEFGHIJKLM")
uppercases all lowercase letters in somestring in the first half of the alphabet and removes all those appearing in the second half. If somestring is “VW mini-bus,” this returns the string “VW MII-B”: the uppercase letters “VW” (uppercase letters don’t appear in string2, so they’re passed unchanged), a space, the uppercased “mi” and “i” from “mini,” the hyphen, and the uppercased “b” from “bus.” The “n” in “mini” and the “us” in “bus” are suppressed.
If for some reason it’s desirable, string3 may be longer than string2. This is not necessary, because the function considers only those characters in string3 up to the length of string2. It’s just like you omitted those characters from string3 in the first place.

10) concat(string1, string2, ...)

    Key: The concat() function takes at least two arguments and forges them into a single string. The function provides no padding with whitespace, so if you’re constructing (say) a list of tokens, or a set of words into a phrase or sentence, you’ve got to include the " " characters and perhaps punctuation separating one from the other. For instance, assume that the context node at a given point is any of the relic elements in the sample XML document. Then:
concat(price, " (", price/@currency, ")")
builds a string consisting of that relic’s price, a space an opening parenthesis, the currency in which the price is represented, and a closing parenthesis. Given our sample document, for the seven relics in question, this would yield the strings (respectively):
9.00 (USD)
39.95 (GBP)
70.75 (EU)
.37 (GBP)
323.65 (USD)
8500.00 (USD)
Note that the figures 9.00, .37, and 8500.00 do not follow the rules outlined above for representing numeric values as strings. If for some reason you want to force this representation, you need to explicitly convert the price element nodes’ string-values to numbers (using the number( ) function discussed later), pass this result to string(), and finally, pass that function’s result to concat() as its first argument. Like this:
concat(string(number(price)), " (", 
   price/@currency, ")")
Also note in this case that the call to string( ) is optional. Because concat( ) expects a string-type argument, it does any necessary conversion automatically.

Boolean Functions:
XPath Boolean functions are used for convert argument(as number, string) to a boolean and return either True or False.
1) boolean(number|string|node-expression|object): function       convert to it’s argument to a boolean.
Possible condition :
  • number returns True if number value does not zero, NaN, negative.
  • string returns True if string length does not zero.
  • node-expression returns True if node-expression referred node does not empty. object convert into dependent type.
  • object convert into dependent type.
2) not(): not function returns true, If it’s argument is false.   Otherwise return false.
3) true(): true() function returns true if passed string is a normal   string.
4) false(): false() function returns false if passed string is not a normal string.
5) lang(): lang() function returns true if context node language same as specified string argument.

Namespace Functions:

These functions let you determine the namespace characteristics of a node.
  1. local-name(): Returns the name of the current node, minus the namespace prefix.
  2. local-name(...): Returns the name of the first node in the specified node set, minus the namespace prefix.
  3. namespace-uri(): Returns the namespace URI from the current node.
  4. namespace-uri(...): Returns the namespace URI from the first node in the specified node-set.
  5. name(): Returns the expanded name (URI plus local name) of the current node.
  6. name(...): Returns the expanded name (URI plus local name) of the first node in the specified node-set.

XPath Parent, Child and Grandparent Concepts:

The XPath Axes : 
XPath has 13 different axes, which we shall go through in this section. An XPath axis directs the XPath processor to the “direction” in which to head in as it navigates around the node hierarchical tree(HTML Code).

Xpath axis:

1) self: Which contains only the context node
2) ancestor: contains the ancestors of the context node, that is, the parent of the context node, its parent, etc., if it has one.
3) ancestor-or-self: contains the context node and its ancestors
4) attribute: contains all the attribute nodes, if any, of the context node
5) child: contains the children of the context node
6) descendant: contains the children of the context node, the children of those children, etc.
7) descendant-or-self: contains the context node and its descendants
8) following: contains all nodes which occur after the context node, in document order
9) following-sibling: Selects all siblings after the current node
10) namespace: contains all the namespace nodes, if any, of the context node
11) parent: Contains the parent of the context node if it has one
12) preceding: contains all nodes which occur before the context node, in document order
13) preceding-sibling: contains the preceding siblings of the context node


1) Child Axis: 
    Key: The Child Axis defines the child of the context node.
    Thumb-Rule: //Child::<tag-name>
    Returns the matching element in DOM starting from the first element matching the tag-name from the root.

Example Xpath: //child::div


Coders Tip: //child::* shall return all elements in the DOM

2) Parent Axis: 
    Key: The parent axis contains only a maximum of one node. The parent node may be either the root node or an element node.
The root node has no parent; therefore, when the context node is the root node, the parent axis is empty. For all other element nodes the parent axis contains one node.
   Thumb-Rule: <Xpath>/parent::<tag-name>
    Returns the parent element of the context node(the xpath specified in Blue).
Xpath: //input[@id='pass']/parent::td


33) Following Axis: 
   Key: Following axis contains all nodes after the node marked node that are after the context node in document order.
    Thumb-Rule: <Xpath>/following::<tag-name>
   Returns the following element of the context node(the xpath specified in Blue).

Xpath: //input[@id='pass']/following::td


4) Following-Sibbling Axis: 
    Key: The following-sibling axis selects those nodes that are siblings of the context node(at the same level in the DOM)
     Thumb-Rule: <Xpath>/following-sibling::<tag-name>
    Returns the node after the context node(the node for the Xpath above in Blue)
Xpath: //*[@id='b-getorpost']/following-sibling::a


5) Preceding Axis:
    Key: Preceding axis contains all nodes before the node marked node that are after the context node in document order.
     Thumb-Rule: <Xpath>/Preceding::<tag-name>

    Returns the following element of the context node(the xpath specified in Blue).
Example Xpath: //input[@id='pass']/preceding::td


6) Preceding-Sibling Axis:
    Key: The following-sibling axis selects those nodes that are siblings of the context node(at the same level in the DOM)
     Thumb-Rule<Xpath>/preceding-sibling::<tag-name>
    Returns the node before the context node(the node for the Xpath above in Blue)
Xpath: //*[@class='b-link']/preceding-sibling::a


Working with Pseudo elements in Selenium WebDriver

What are pseudo-elements? A CSS pseudo-element is a keyword added to a selector that lets you style a specific part of the selected elem...